
Explorer LR 4 O4 PRO V2
A Sub250 micro long-range FPV drone designed for the DJI O4 air unit system.
1 Overview
Explorer LR 4 O4 PRO V2 is a 4-inch micro long-range FPV drone under 250 g. It is built around the latest DJI O4 Pro HD air unit system. The V2 version upgrades the camera damping structure with four custom damper balls to reduce jello from newer gyro batches. Factory GPS Rescue presets and an independently powered Finder give you extra confidence for long-range flights.
Sub250 Compliant
Approx. 246 g takeoff weight with a 4S 750mAh battery for compliant, portable flying.
Extended Endurance
Up to approx. 28 minutes of cruising with an 18650 3000mAh battery.
Safety Ready
Includes an independently powered Finder buzzer and GOKU GM10 GPS.
2 Specs & Dimensions
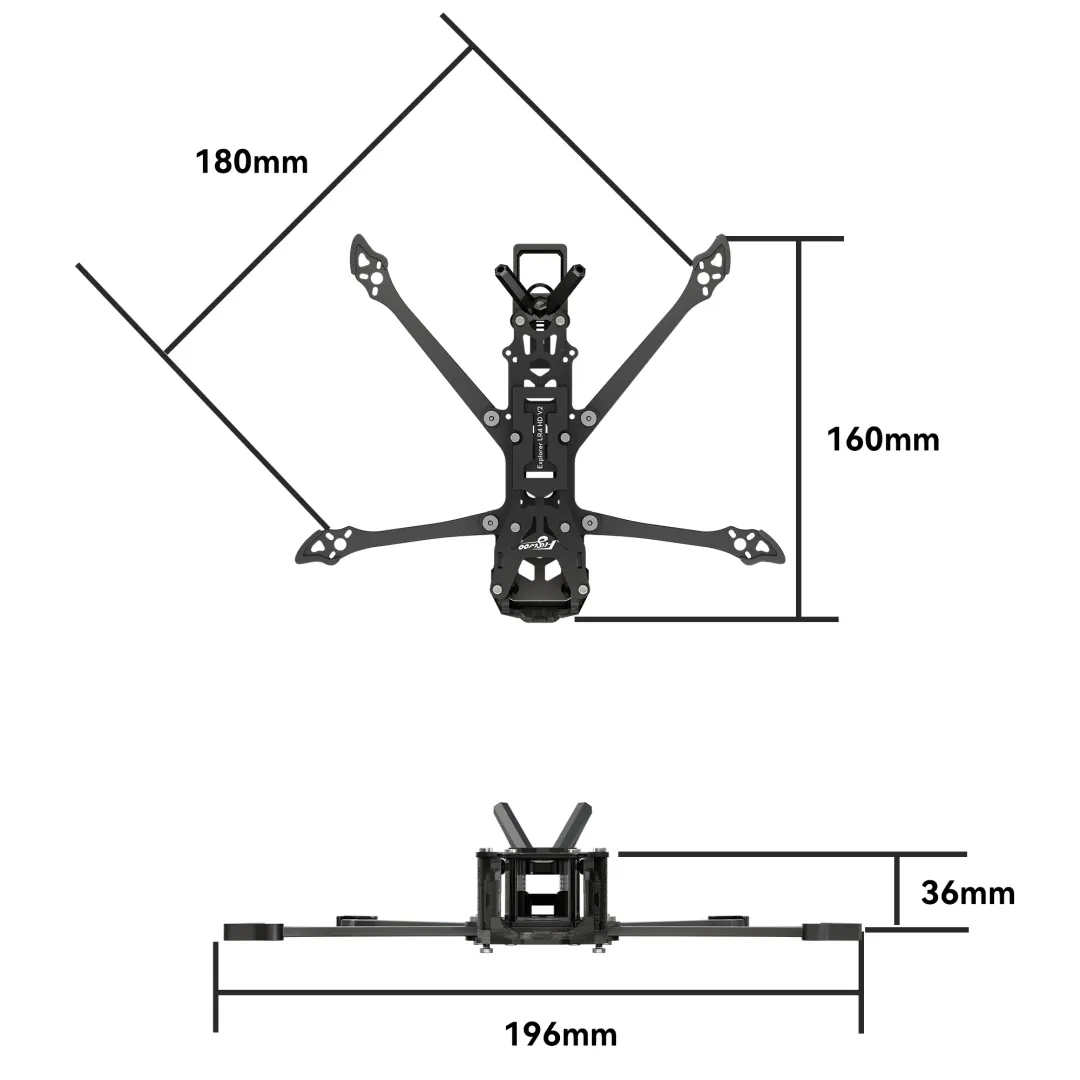
- Product Name: Explorer LR 4 V2 Frame Kit
- Category: 4-inch long-range FPV frame kit
- Frame Weight: Approx. 52g net frame weight
- Camera Structure: V2 damping structure with four rubber damper balls
- Camera Size Support: 20 x 20mm
- Air Unit Support: O3 / O4 Wide / O4 Pro / Walksnail Pro kit air unit installation
- Motor Mount Hole: φ9mm / φ12mm
- FC + ESC Mounting: 16 x 16mm / 20 x 20mm mounting hole patterns
- FC + ESC Installation Space: Approx. 19.5mm height x 32.5mm width
- VTX Mounting: 16 x 16mm / 20 x 20mm / 25.5 x 25.5mm mounting hole patterns
- VTX Installation Space: Approx. 19.5mm height x 43mm width
- Reserved Mounting Positions: GPS and buzzer / FLYWOO Finder mounting positions
- Recommended Accessories: FLYWOO Finder V1.0 and GOKU GM10 Mini GPS
3 Packing List
Explorer LR 4 O4 PRO V2 offers BNF and Drone Kit versions. Please select the corresponding packing list:

- Hex Wrench x 1
- ND Filter x 1
- 15x180mm Battery Straps x 2
- 4024-2 Propellers x 8
- Battery Anti-Slip Pads x 2
- 90° USB Type-C Data Cable x 1
- Hardware Screw Sets x 1
- Side Plate x 2

4 FC Interface & UART
The GOKU F722 MINI 45A FC supports plug-and-play for VTX, GPS, and receiver. Please refer to the default UART port mapping below.
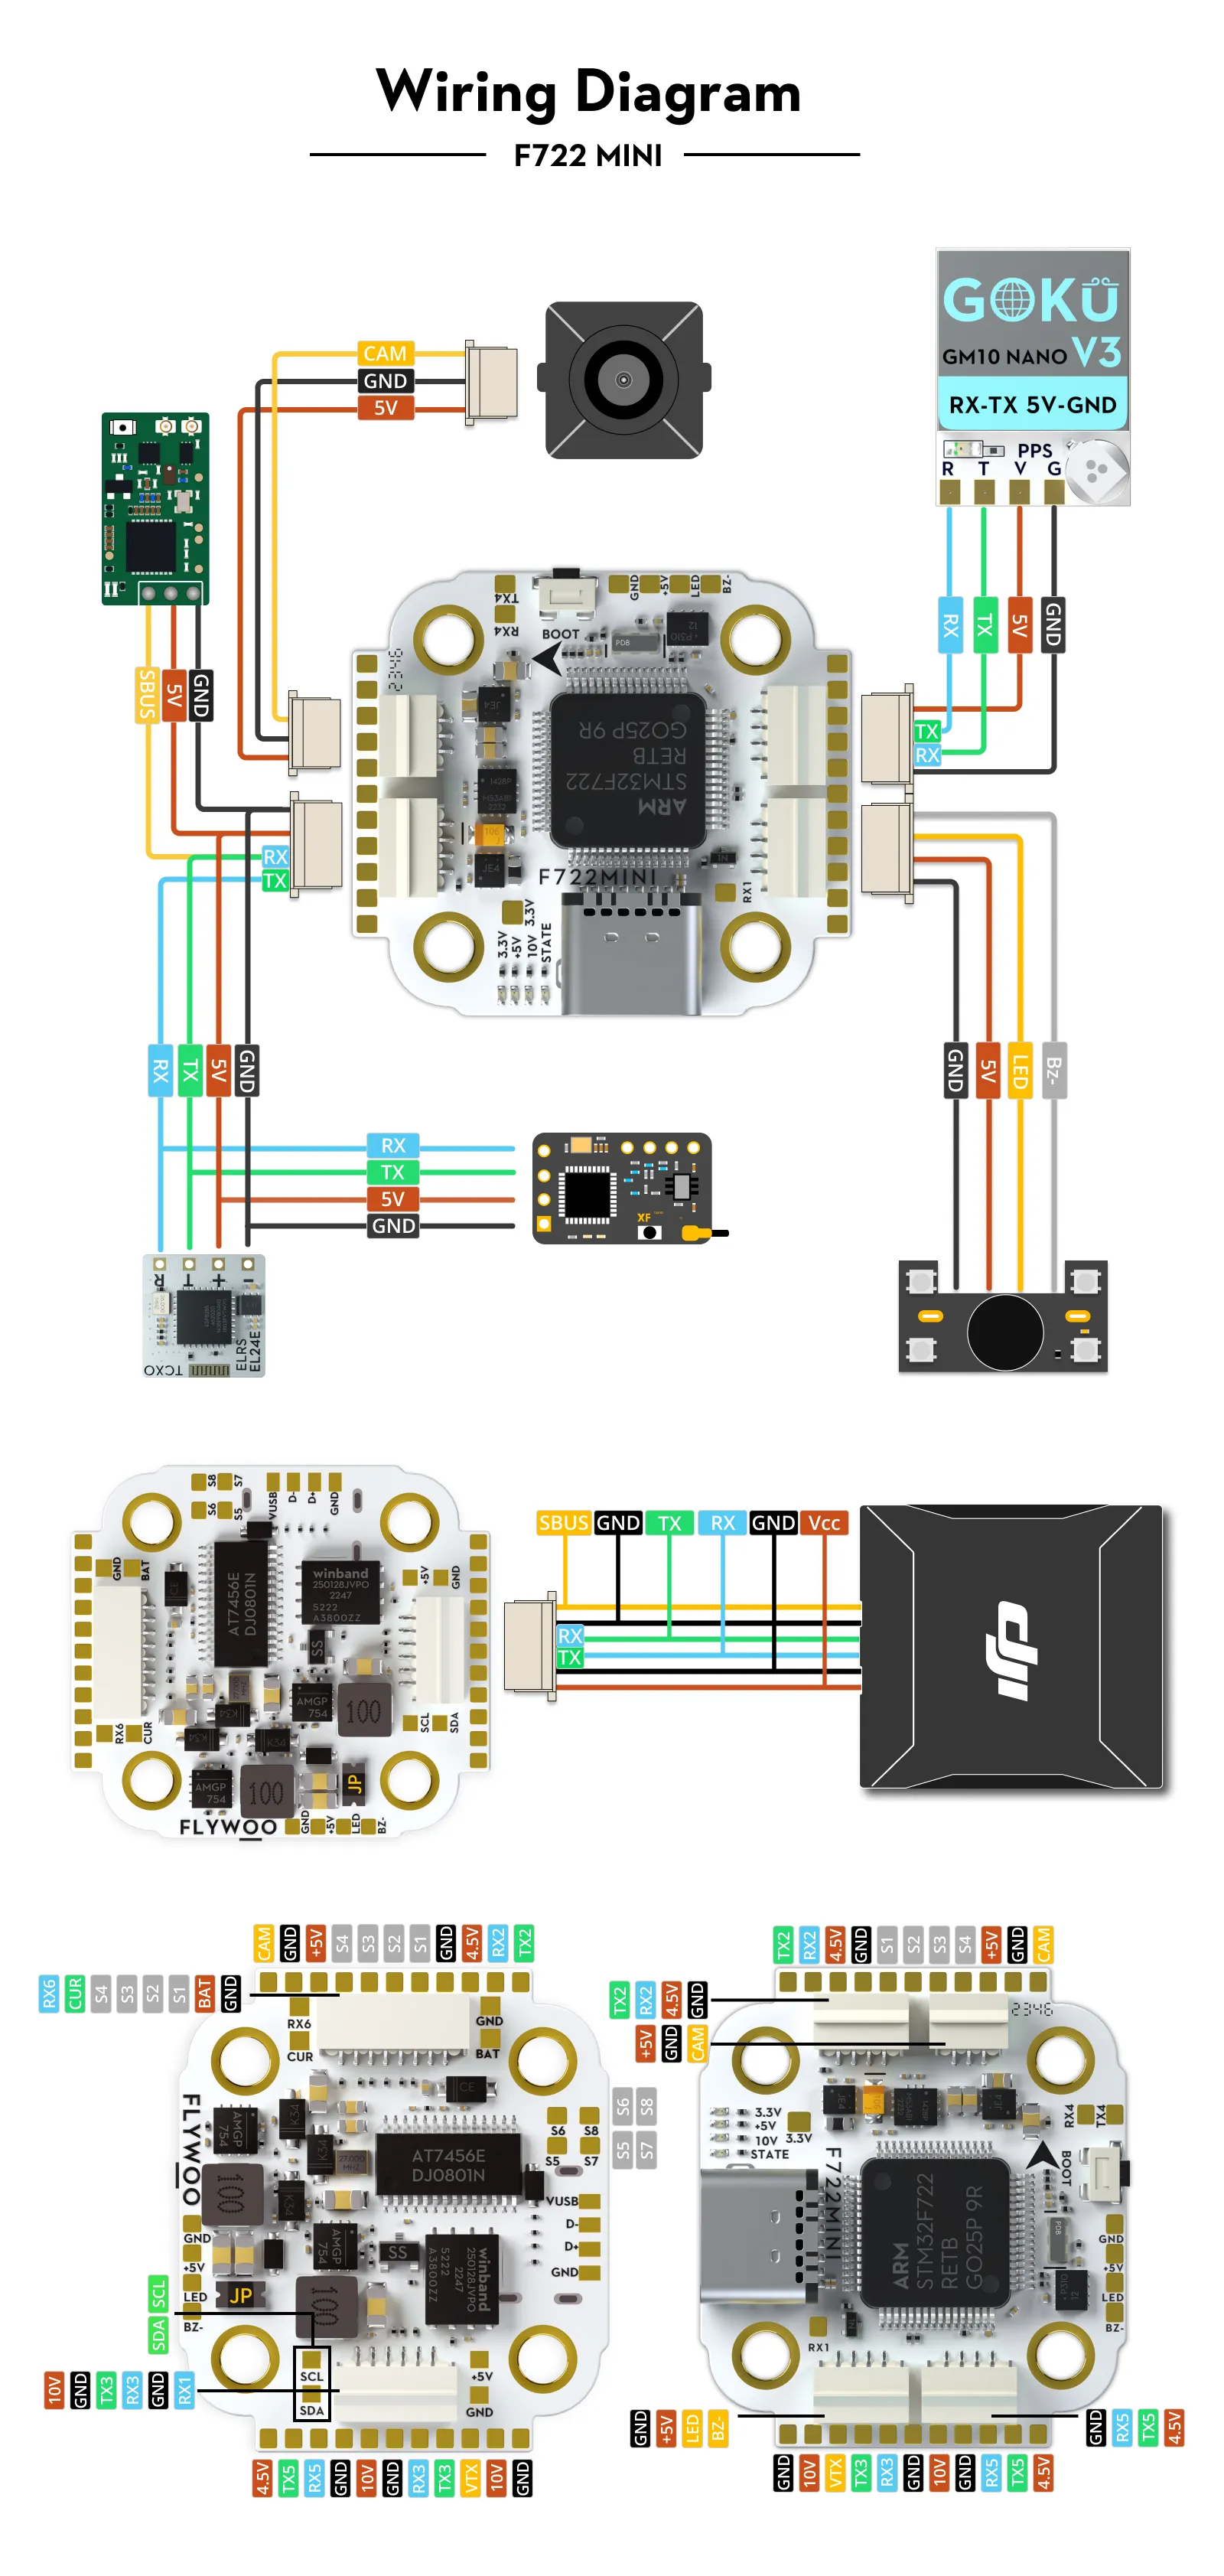
VTX (DJI O4) & SBUS UART 3 UART 1 (SBUS)
Enable Configuration/MSP on UART 3 for OSD. If using DJI RC, enable Serial Rx on UART 1 for SBUS.
Receiver (ELRS/TBS) UART 2
Enable Serial Rx on UART 2 in Betaflight.
GPS Module UART 5
Set UART 5 sensor to GPS in Betaflight, baud rate 115200 or Auto.
Buzzer (Finder) BZ+ / BZ-
Connects to the Finder buzzer with internal battery for power-loss alarms.
5 Assembly
O4 Air Unit & Damping Mount Guide
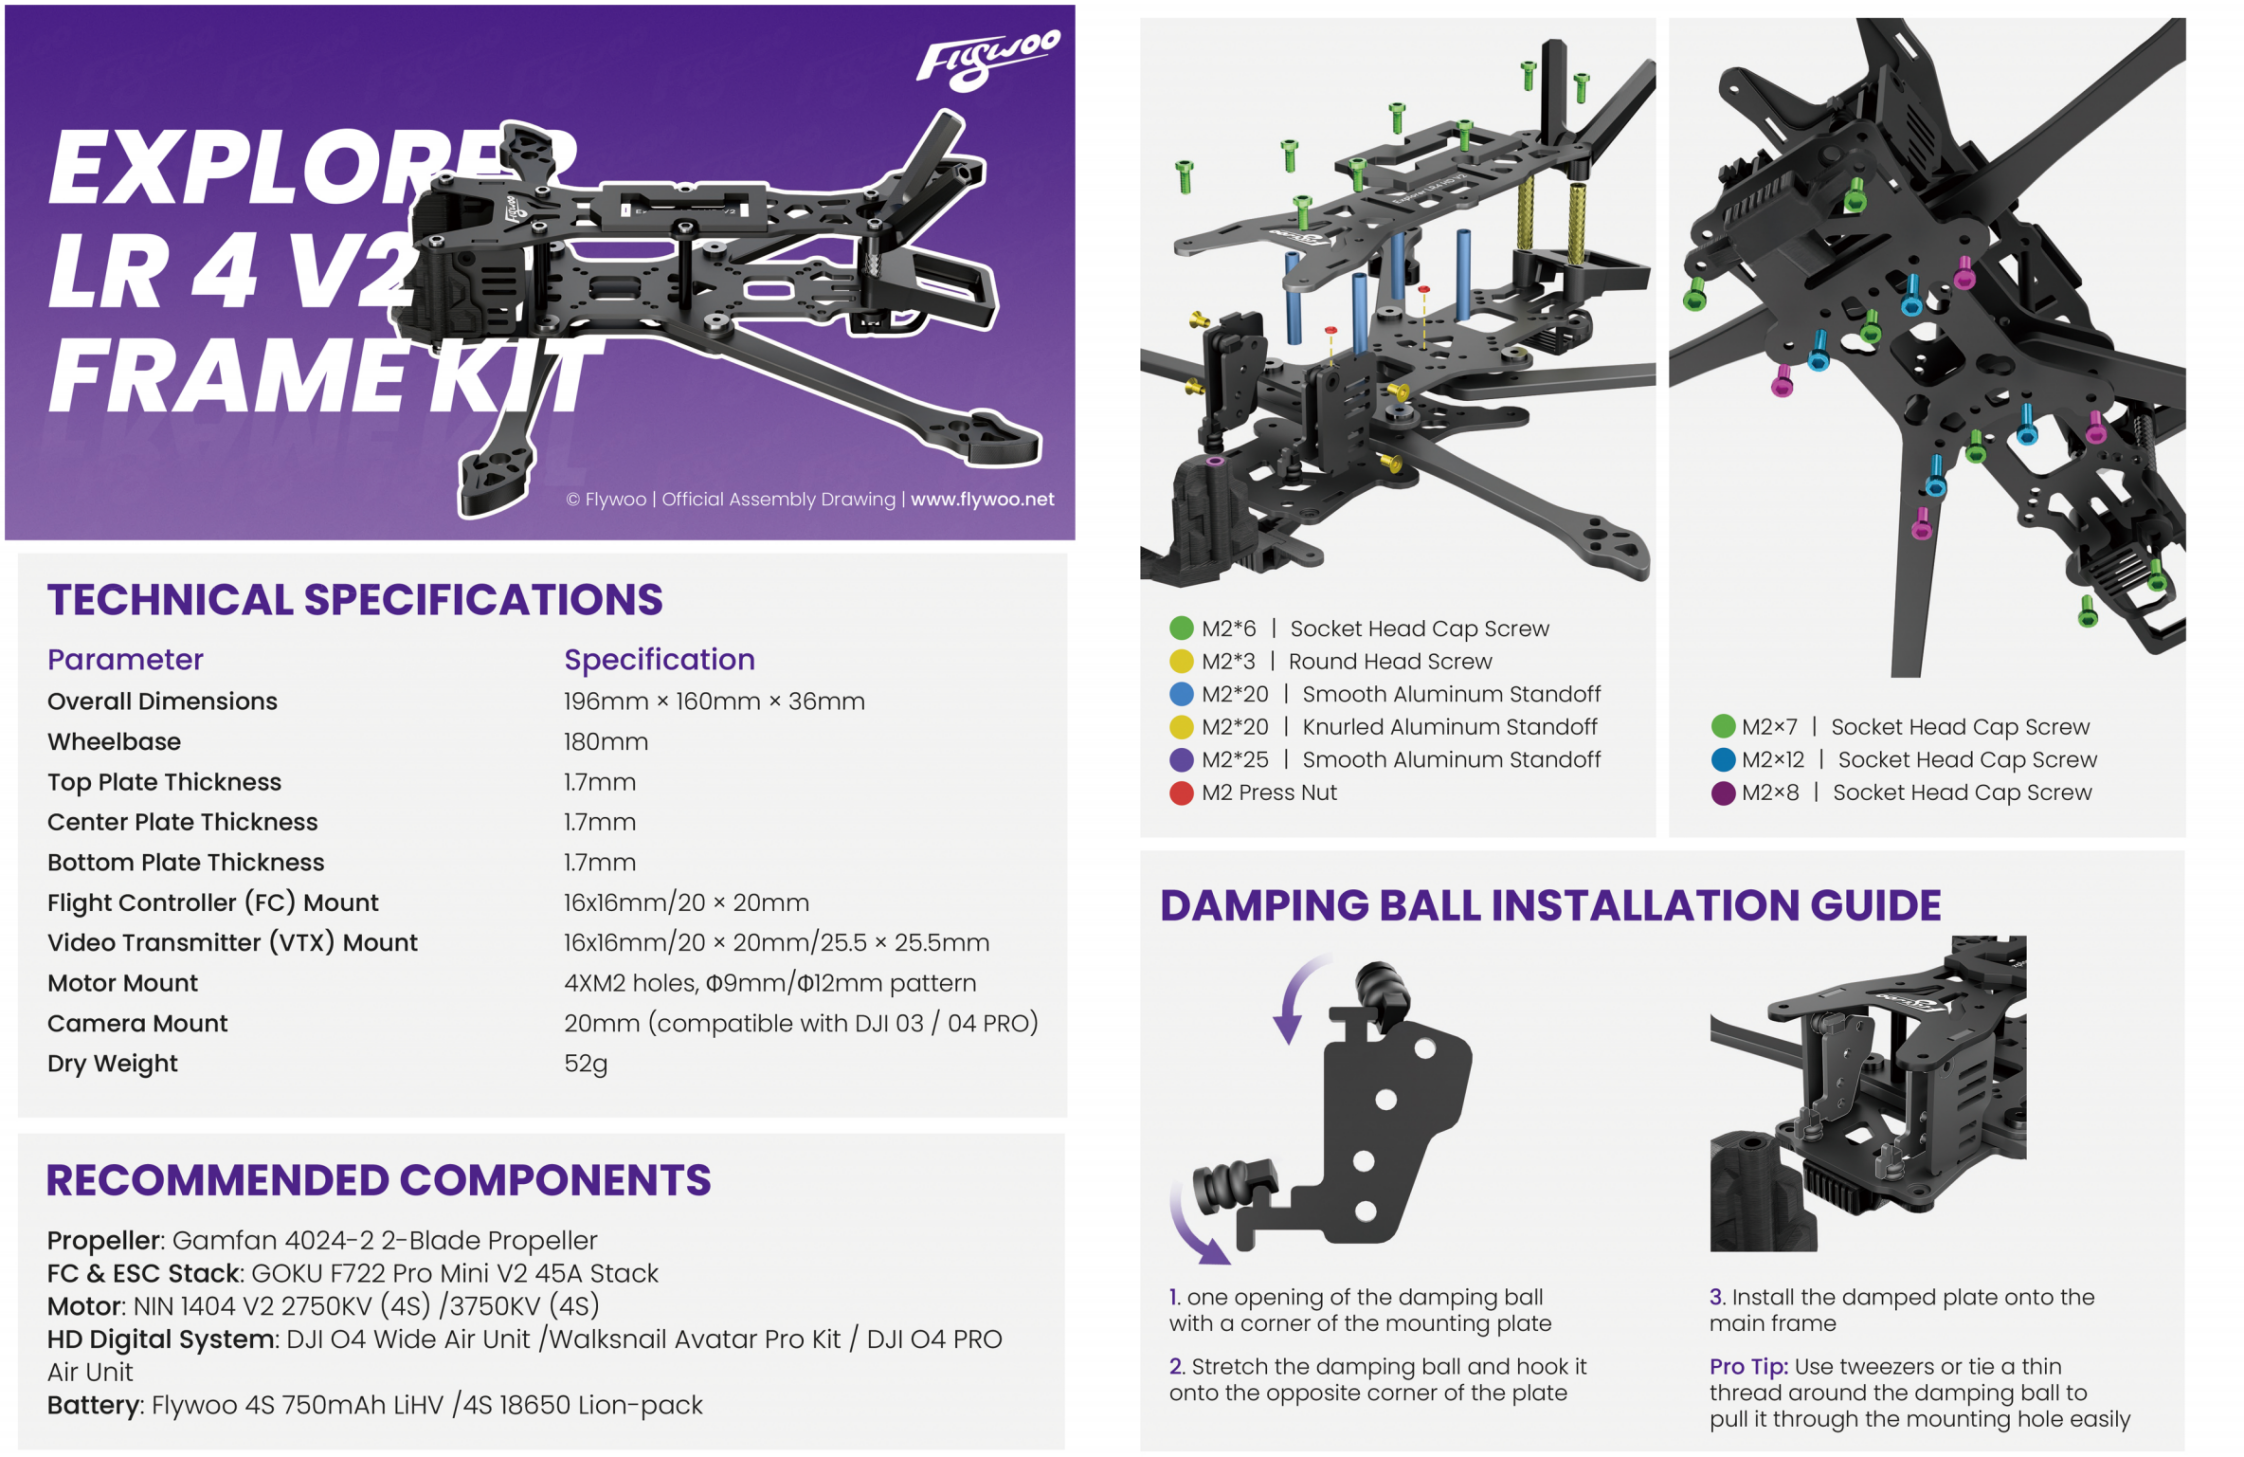
- 4-point damping: Use four dedicated custom damper balls to secure the camera CNC bracket to the front carbon plate and reduce high-frequency jello.
-
Cable protection: Leave a small amount of slack in the O4/O4 PRO coaxial cable to avoid pulling or cutting against the carbon frame edge.
Note: If the coaxial cable is not installed correctly or is pulled too tight, it can restrict the camera damping structure and may cause jello in the video image.
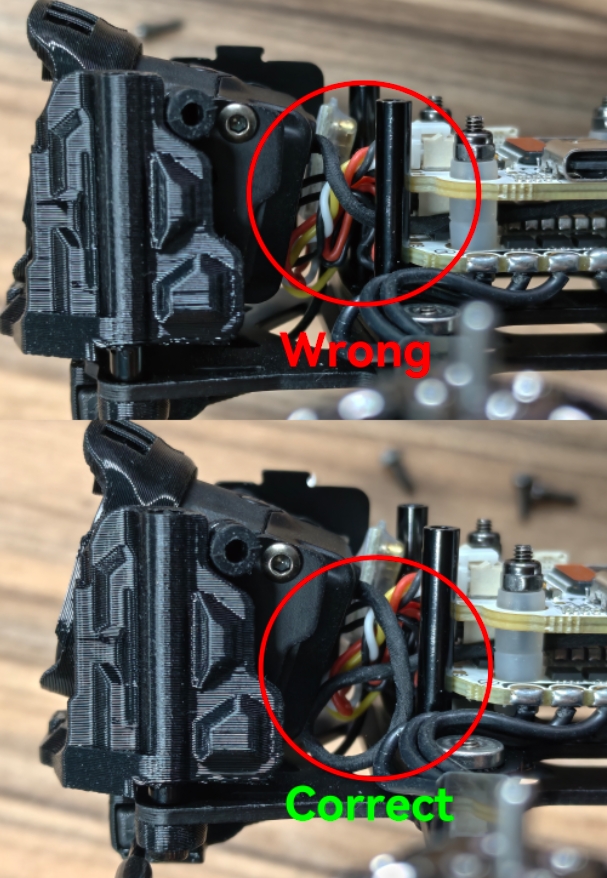 Operation Image Click to view cable routing detail
Frame Side Brace Installation (Important Reinforcement)
For windy conditions or occasional aggressive maneuvers, we strongly recommend installing the two carbon fiber side braces. Remove the corresponding screws under the motors, align the side brace with the mounting holes, and tighten the screws again to greatly improve frame torsional rigidity.
6 Receiver Binding
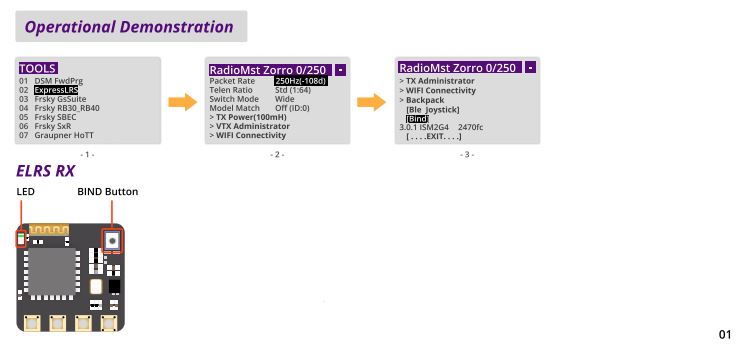
ELRS (ExpressLRS)
Method 1 (Recommended - Binding Phrase):Use ExpressLRS Configurator to flash the same binding phrase to the receiver, and it will connect automatically.
Method 2 (Power-cycle binding):Quickly plug and unplug the drone battery three times. On the third power-up, the receiver LED will double-flash. Click Bind in the ELRS LUA script on the radio.
TBS Crossfire / Tracer
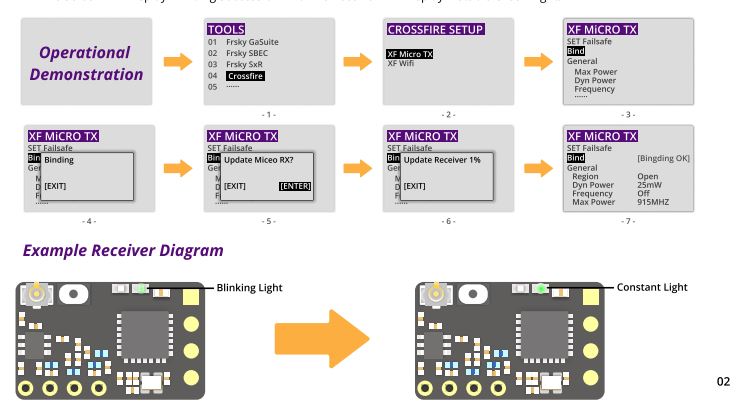
Hold the Bind button on the receiver while powering on, or press Bind quickly after power-up, until the green LED flashes rapidly. In the TBS Agent Lite LUA script on the radio, select the transmitter module and click Bind. Keep the receiver powered if a firmware update prompt appears.
7 Mode Setting
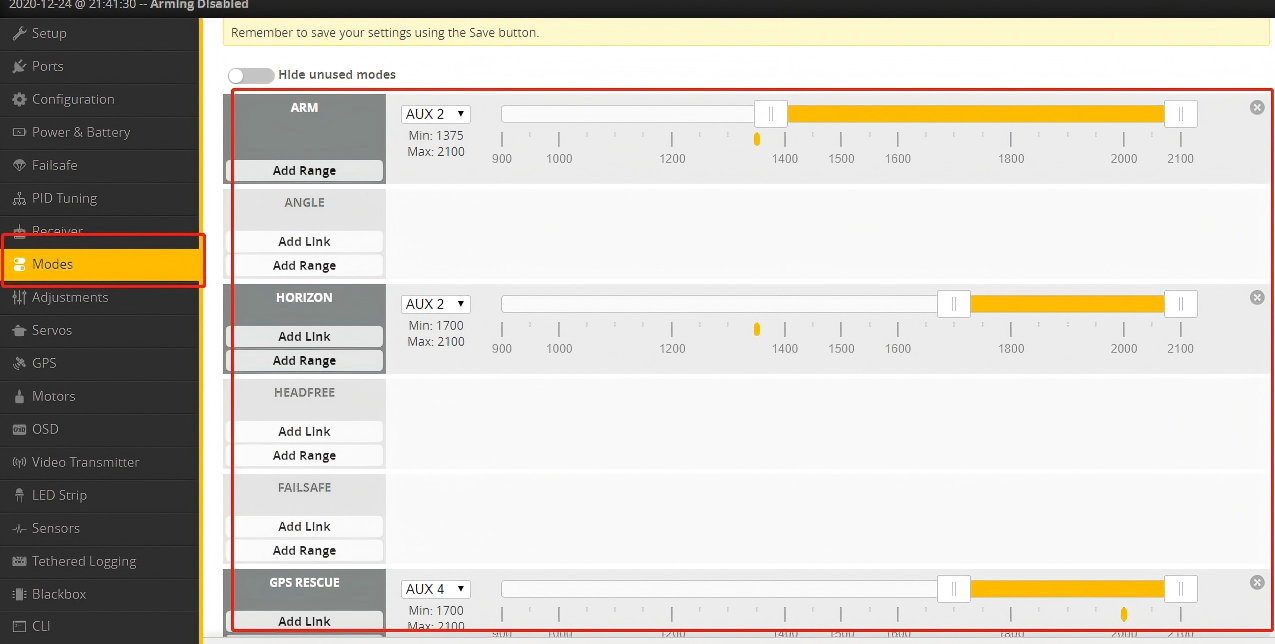
In the Modes tab in Betaflight, you can assign functions to radio switches. The following channel mapping is recommended by FLYWOO:
| Function | Channel (AUX) | Description |
|---|---|---|
| ARM | AUX 1 | Controls motor start/stop. |
| ANGLE / HORIZON | AUX 2 | Angle/Horizon stabilized mode. When disabled, the default mode is Acro. |
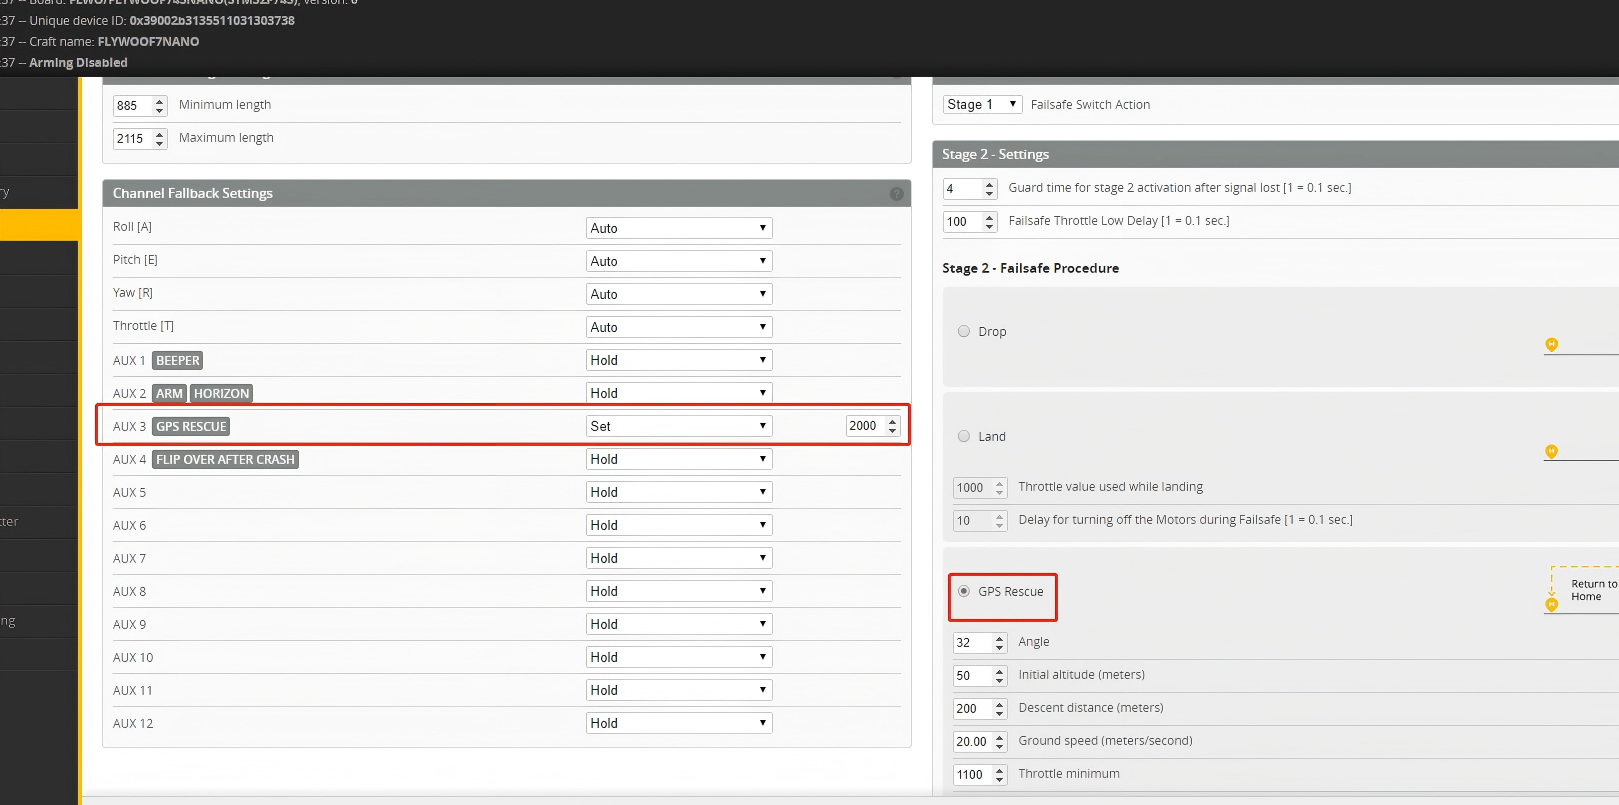
| GPS RESCUE | AUX 3 | Toggle this switch to force GPS Rescue return-to-home. |
| BEEPER | AUX 4 | Forces the buzzer to sound for locating the drone. |
8 Motor Testing
- In the Motors tab in Betaflight, connect the battery.
- Check I understand the risks in the lower-right corner.
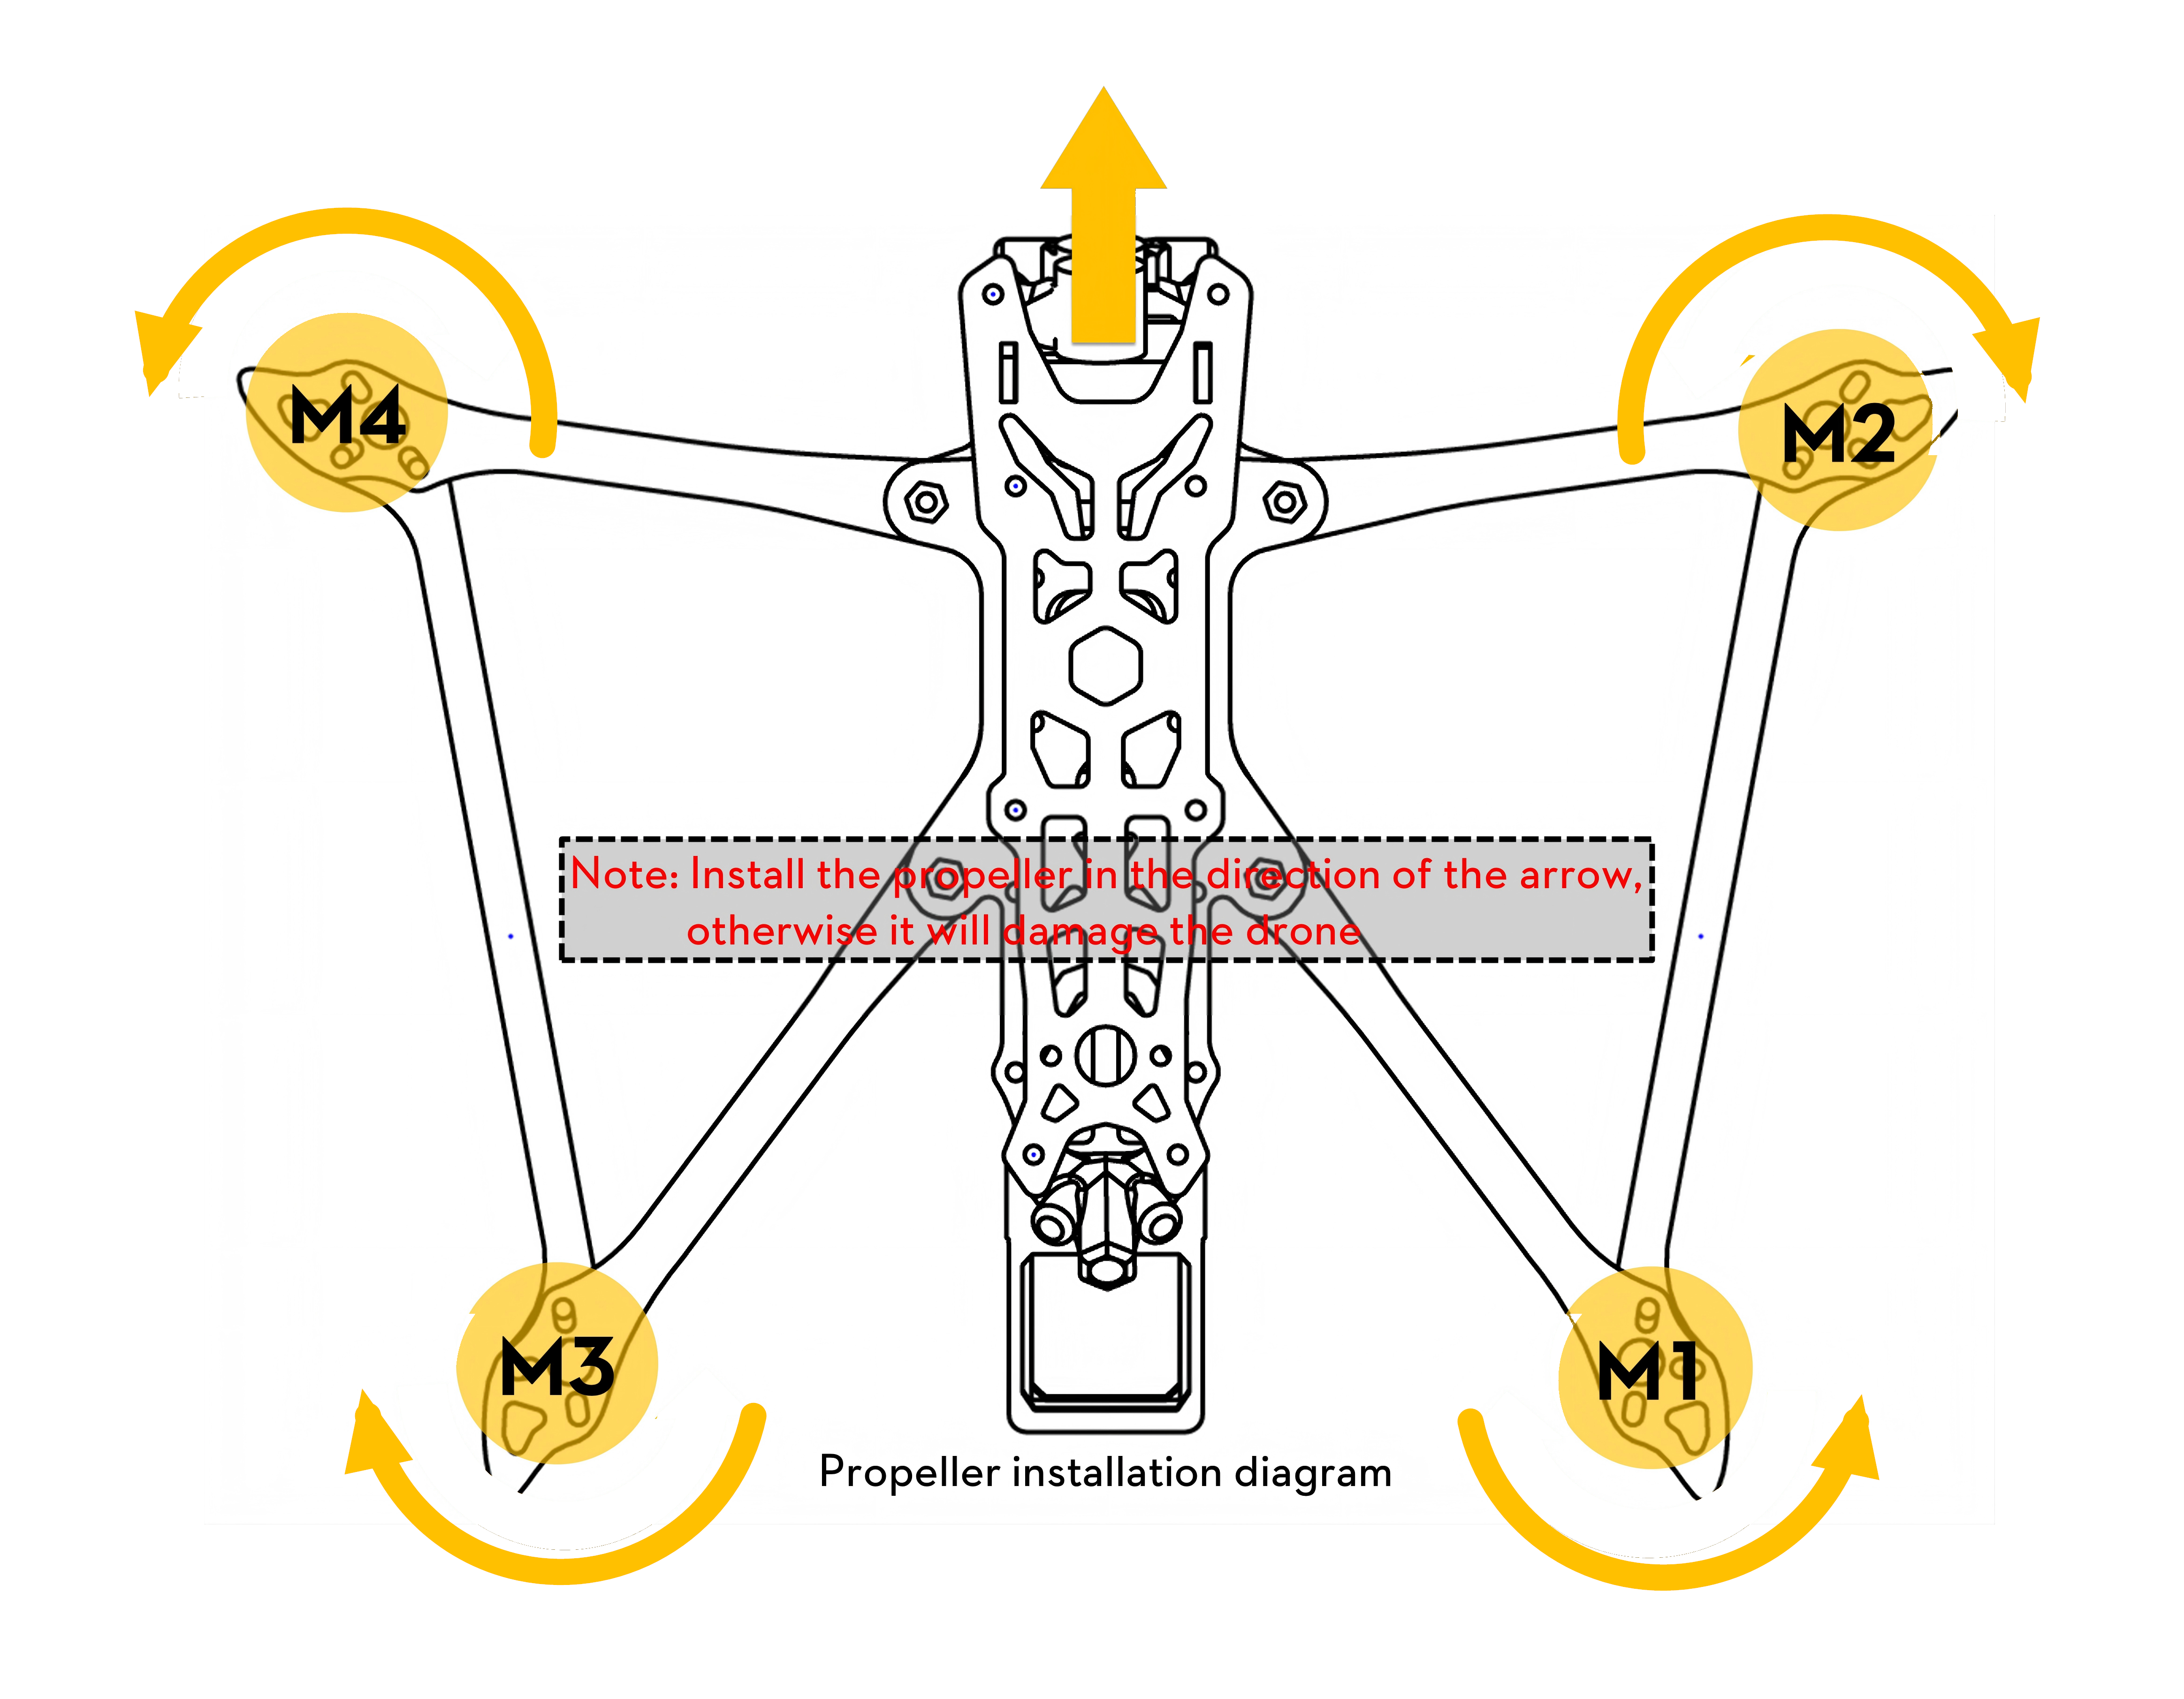
- Slowly raise each motor slider and observe the rotation direction.
- The default configuration is reversed rotation (Props Out). If the direction is incorrect, reverse the corresponding motor using the wizard or ESC software.
9 GPS & Safety
GPS Rescue Mode
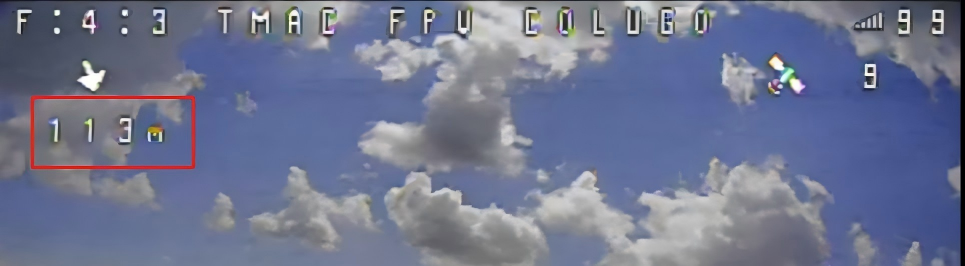
- Satellite requirement: Acquire at least 5 satellites, preferably 8-10 or more, and refresh the Home point. The OSD will show latitude/longitude and distance.
- Distance limit: The flight distance must exceed 100 m, or the minimum distance set in Betaflight. If failsafe triggers within 100 m of the takeoff point, the drone will execute Drop.
- Behavior: After triggering, the drone will turn around, climb slowly, and fly back. Note: the drone will not land automatically. When video or radio signal recovers, immediately take over control and land manually.
FLYWOO Finder Operation
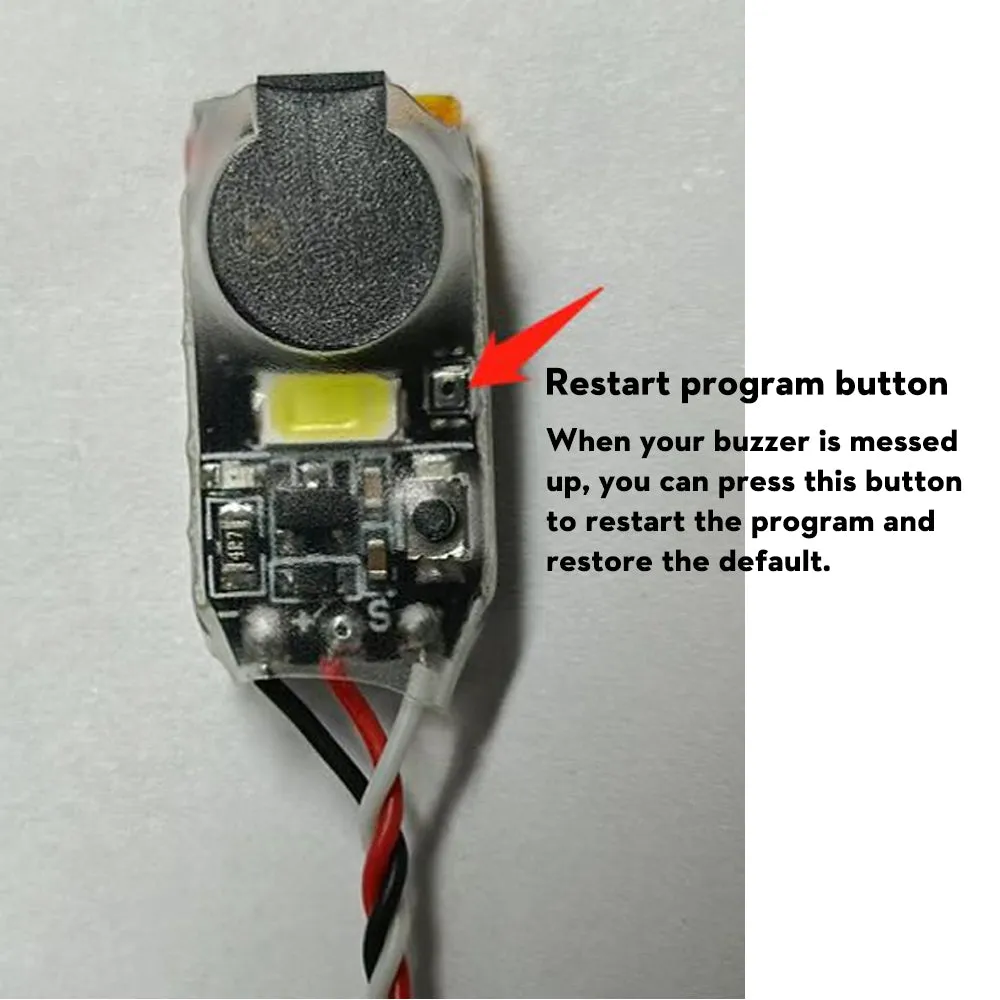
If the main battery is ejected during a crash, the internal battery takes over automatically. After 30 seconds, it emits an alarm up to 100 dB with LED flashing, and can continue for several hours.
10 Firmware Update & CLI
If you need to reset the flight controller or flash new firmware, follow this process:
1 Enter DFU Mode (Bootloader)
In the Betaflight Setup page, click Activate Boot Loader / DFU. If the device is not recognized, download and run ImpulseRC Driver Fixer to repair the low-level driver.
2 Flash Firmware
On the Firmware Flasher page, select the correct flight-controller target, for example the factory FC target: FLYWOOF722PROV2. Load an online or local HEX file, then click Flash. A green progress bar indicates completion.
3 Import Factory CLI (Custom Defaults)
After flashing new firmware, the flight controller will be blank. Go to the FLYWOO Support Center to download the CLI text file for the corresponding model.
- Connect to Betaflight and open the CLI tab.
- Copy the downloaded code, paste it into the bottom input box, and press Enter.
- After everything loads, type
savein the bottom input box and press Enter. - The flight controller will reboot, and all factory VTX port, PID, OSD, and related settings will be restored automatically.